Hades Widebody: A "Did It Myself" Virtual Reality Headset
Otherwise known as "What happens when no one wants to make the headset you want so you say "Screw it, I'll do it myself.""
Introduction
I'm what someone would call "A enthusiast" of the whole VR thing. Lovingly used a HTC Vive for many years, but even with how solidly built it is, its piddly resolution and field of view (FoV) were getting to me, so a replacement was needed. The problem, no one wants to make the headset I want.
The Perfect VR Headset Requirements
At least 1440p + OLED (Or something to make LCD as good as OLED) + 90hz+ at minimum.
Wider than the "standard" 90°-100° FoV. Ideally as wide as possible.
Aspheric and/or biconvex lenses. As in, not fresnel (at least, where it matters where I'm actually looking). (Pancake in this DIY context is not exactly feasible with the FoV requirement, even if they didn't have bounce-back problems.)
Lighthouse tracked. (Same system the Valve Index / HTC Vive / Vajio Aero / etc. use for positional tracking.)
Uses standard video and data sockets (so USB + HDMI or DisplayPort) on the headset itself, making getting replacement cables down the line possible. Ie, no bulls### proprietary cables.
No invasive bloatware mandate to run the headset. So, let me just boot up SteamVR and NEVER have to think about another piece of software to run the headset itself when not configuring things.
Eye and face tracking built in.
Not skimping out on necessities like top straps, competent microphones, actual headphones that block/muffle sound, decent binocular overlap (How much the view from each eye overlaps with each other as opposed to being image that only exists in one eye), etc.
There are many headset that maybe get a few of these, there is not a VR headset on the market that gets all of these. So, I went and set out to make that headset. And what I wound up building, for those who would know, is a bizarre cross between a Vive Pro Eye and a Pimax Artisan, but with dual lens biconvex + fresnel elements.
Displays and Lenses
Both the displays and the lenses are the things that make or break literally everything else.
Displays
The displays are OLED 1600x1440 panels running at 90hz. (Very similar to what can be found in something like the Vive Pro.) For both technical and availability reasons, these were the ONLY displays I could get off the shelf that would meet the display requirements. Literally only sold by (currently) one vendor on Alibaba. Which THAT was a trip and a half to purchase. (After buying displays with the same stats off of Aliexpress (whom don't have that listing any more) and in my own idiocy managing to snap the corner from one of the displays, killing it instantly.)
Also the reason for the dual HDMI cables, something something HDMI 1.4 to MIPI chips the driver boards these Aliexpress raw display panels nearly universally come with only being able to handle up to something close to a 1440x1600ish resolution at 90hz, and needing two displays, thus two cables. Eventually I'll probably add a DP-MST hub on top to make the two HDMI cables running to the PC one DisplayPort cable, but that's not something I feel any great need to try and do in the immediate.
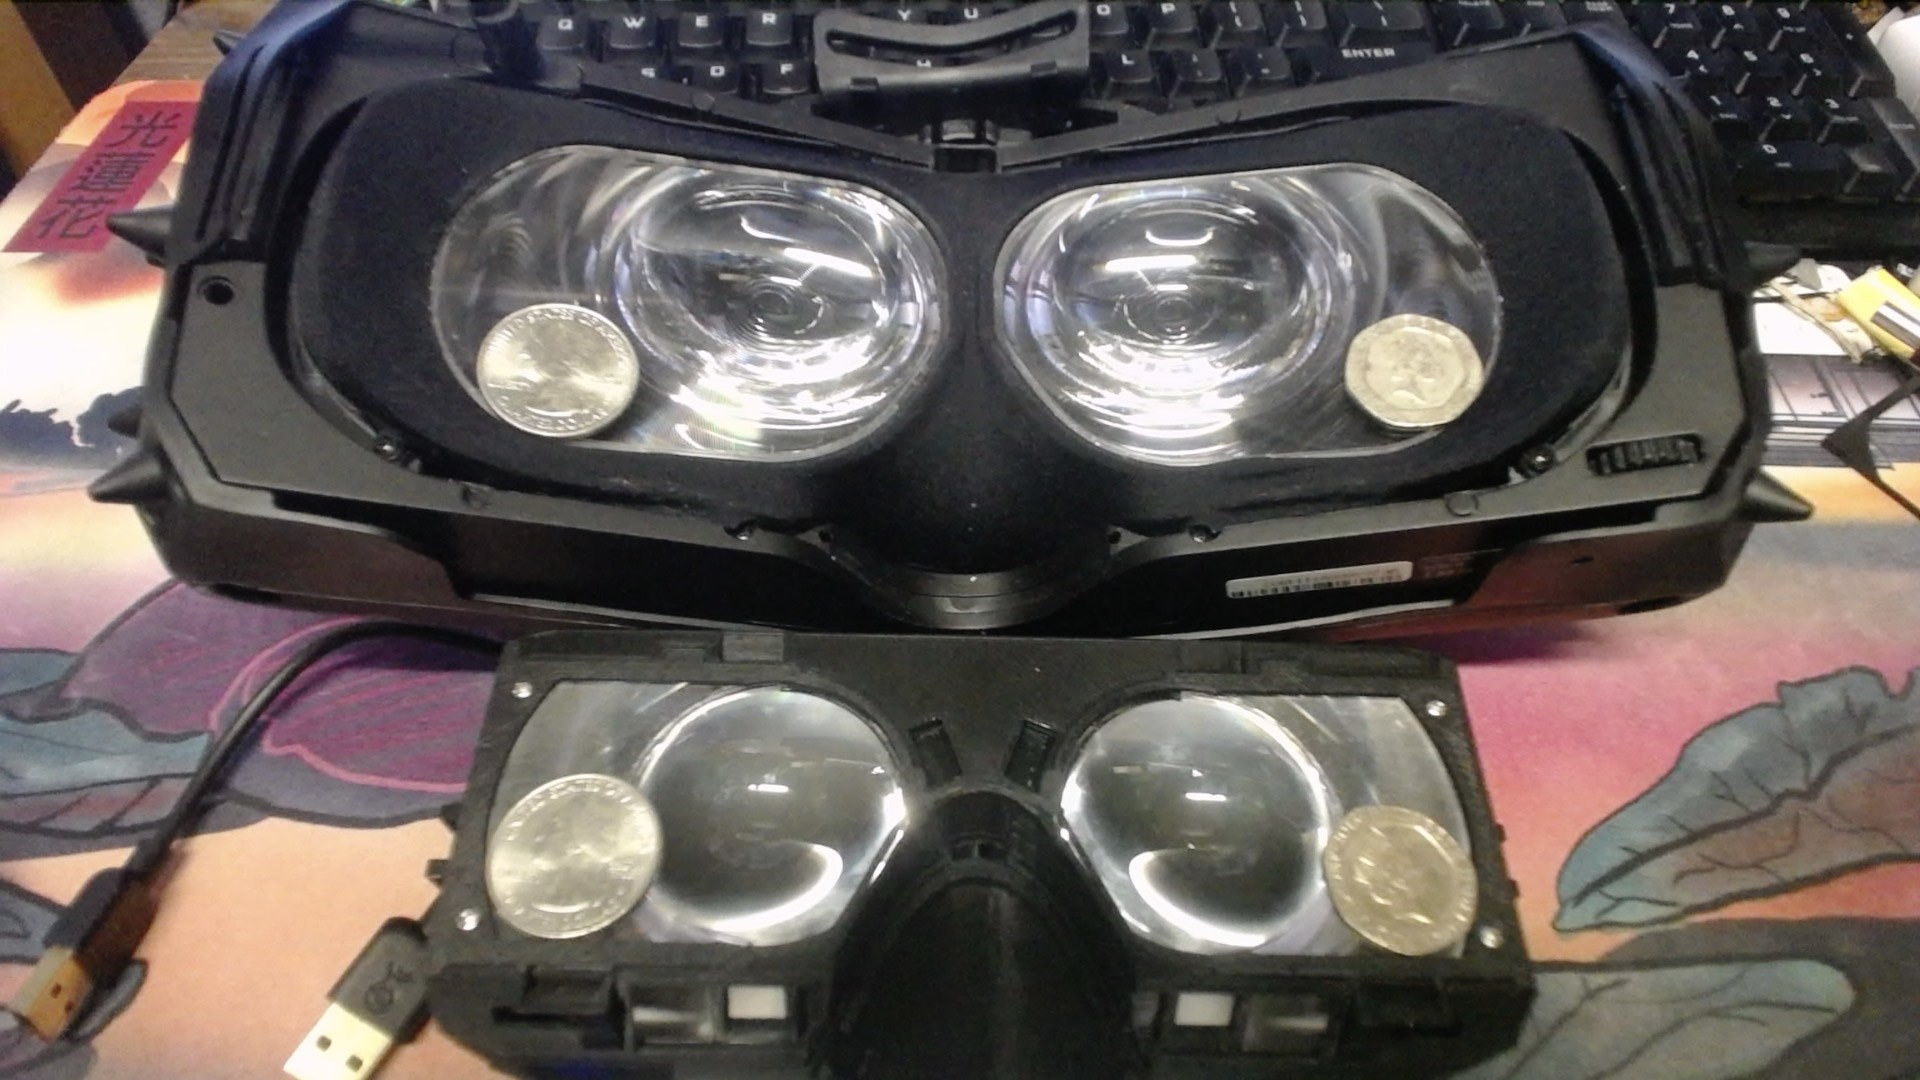
Lenses
The lenses are, a kinda funky arrangement. Originally I wanted to design my own custom lenses with the idea they would be massive honkin' glass things that would then get the top/bottom/one of the sides cut down to fit the profile necessary to work in a headset. I VERY quickly found out why being a optical engineer is called being a optical ENGINEER. So I pansied out from that approach and decided on a alternate avenue...
The main central lenses are straight up GearVR lenses. The GearVR lens mod was done on my OG Vive before I even got it, loved the look of how sharp and the level of edge-to-edge clarity I got with them, but not a fan of how physically small (4cm diameter) they are. The side lenses however, are off-the-shelf 8cm diameter fresnel lenses with a 'close enough' focal length to the GearVR (GearVR's 38mm vs ~4cm on the fresnel lenses) that were cut down to shape to flank the GearVR lenses, extending the width by 2cm.
The effect of these 'periphery' lenses are, what I would describe as miles and MILES better than a ambilight solution (shoving a bunch of LEDs in the inside of the gasket, driven by the VR view, to simulate a wider FoV), as there is actual picture to the outer field of view instead of the implication of it. But less than actually wide lenses as the optical properties of the periphery lenses do not match up with the primary GearVR lenses, with the side view ever so slightly blown up in size. But, with the fact I have to strain my eyes to even look at those periphery lenses directly, it's a effect that works out to be quite pleasant. Now there is a ever so slight darkened outline where the two lenses overlap, but during normal actually-using-the-headset use, that fades into basically nothingness.
(I apologise for the lack of internal photos of this headset. I'm at the point where it's completely working and I DO NOT WANT to take it apart again (a exercise in maximum stress and paranoia I might break something, again) unless something goes horrendously wrong and I HAVE to take it apart to fix it.)
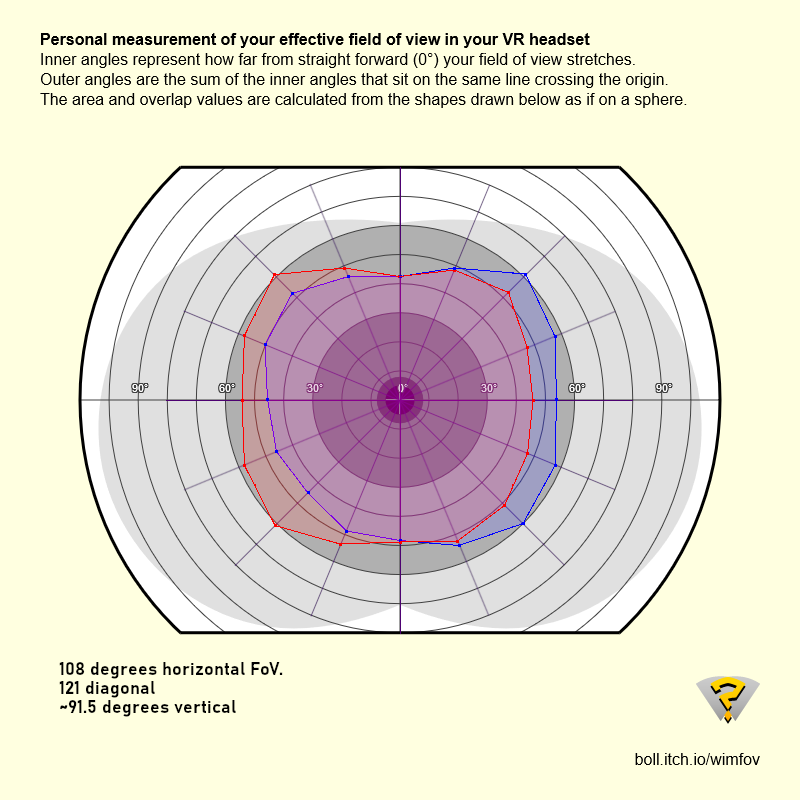
Field of View (FoV)
(Pimax 5k+ vs. the Hades Widebody inner assembly, for size comparison)
The actual FoV is a bit of a weird one. When I tried to do a "Arms outreached in a social VR game, mark down with a pen both where my eyes are and when my hands reach to the edges of my periphery, take a overhead photo and measure the resulting angle.", I got a number of 112.4° (+/- 1.38°) Which comparing with a couple of friends in-game with the exact same in-world scribbles, one of which was using a Valve Index, the other a Vive Pro 2, the FoV was "Wider than a Index, ever so slightly wider than the Vive Pro 2."
(I had to hand-plot the resulting numbers, as I couldn't figure out how I was supposed to make the software display the final results.)
But then I went to check with "What's my Field of View", I got a number of 108°. Which is right around what the Valve Index's FoV is. With the wrinkle on top of that, the width of the panels (they're set in landscape to maximise horizontal FoV) cuts off before the lenses do, meaning I have ~120° of FoV corner to corner, and if the displays were ever so slightly physically wider, easily could get 120° horizontal (read: the only one that matters) out of this lens arrangement.
Which on top of THAT, the FoV and the 'experience' of the FoV doesn't exactly match up either, as the total width of the lens arrangement is 6cm, with a 1cm offset to the outside (4cm GearVR lenses + 2cm of extension, but only approximately as the display width cuts off slightly early), while the Index lenses are 5cm across, centred on that 5cm (Which also means the Index has FAR more vertical FoV than my HMD does, but it's not explicitly designed with the expectation of shoving the lenses RIGHT up against your face to the same degree. My eyebrows and cheeks are right against the top/bottom lines of the vertical FoV). (Which as a note, that's ~1440 pixels of width with a Index, vs. my ~1600 pixels of width over apparently the same horizontal FoV.)
Regardless of the technicalities and caveats, regardless of any actual hard numbers, I'm pretty happy with the resulting width the periphery lenses add. ESPECIALLY going back to the OG Vive and feeling how "Looking through loo roll tubes" that is by comparison. It's not quite "Look straight ahead and I do not see any edge at all", but it's dang well close enough for my purposes.
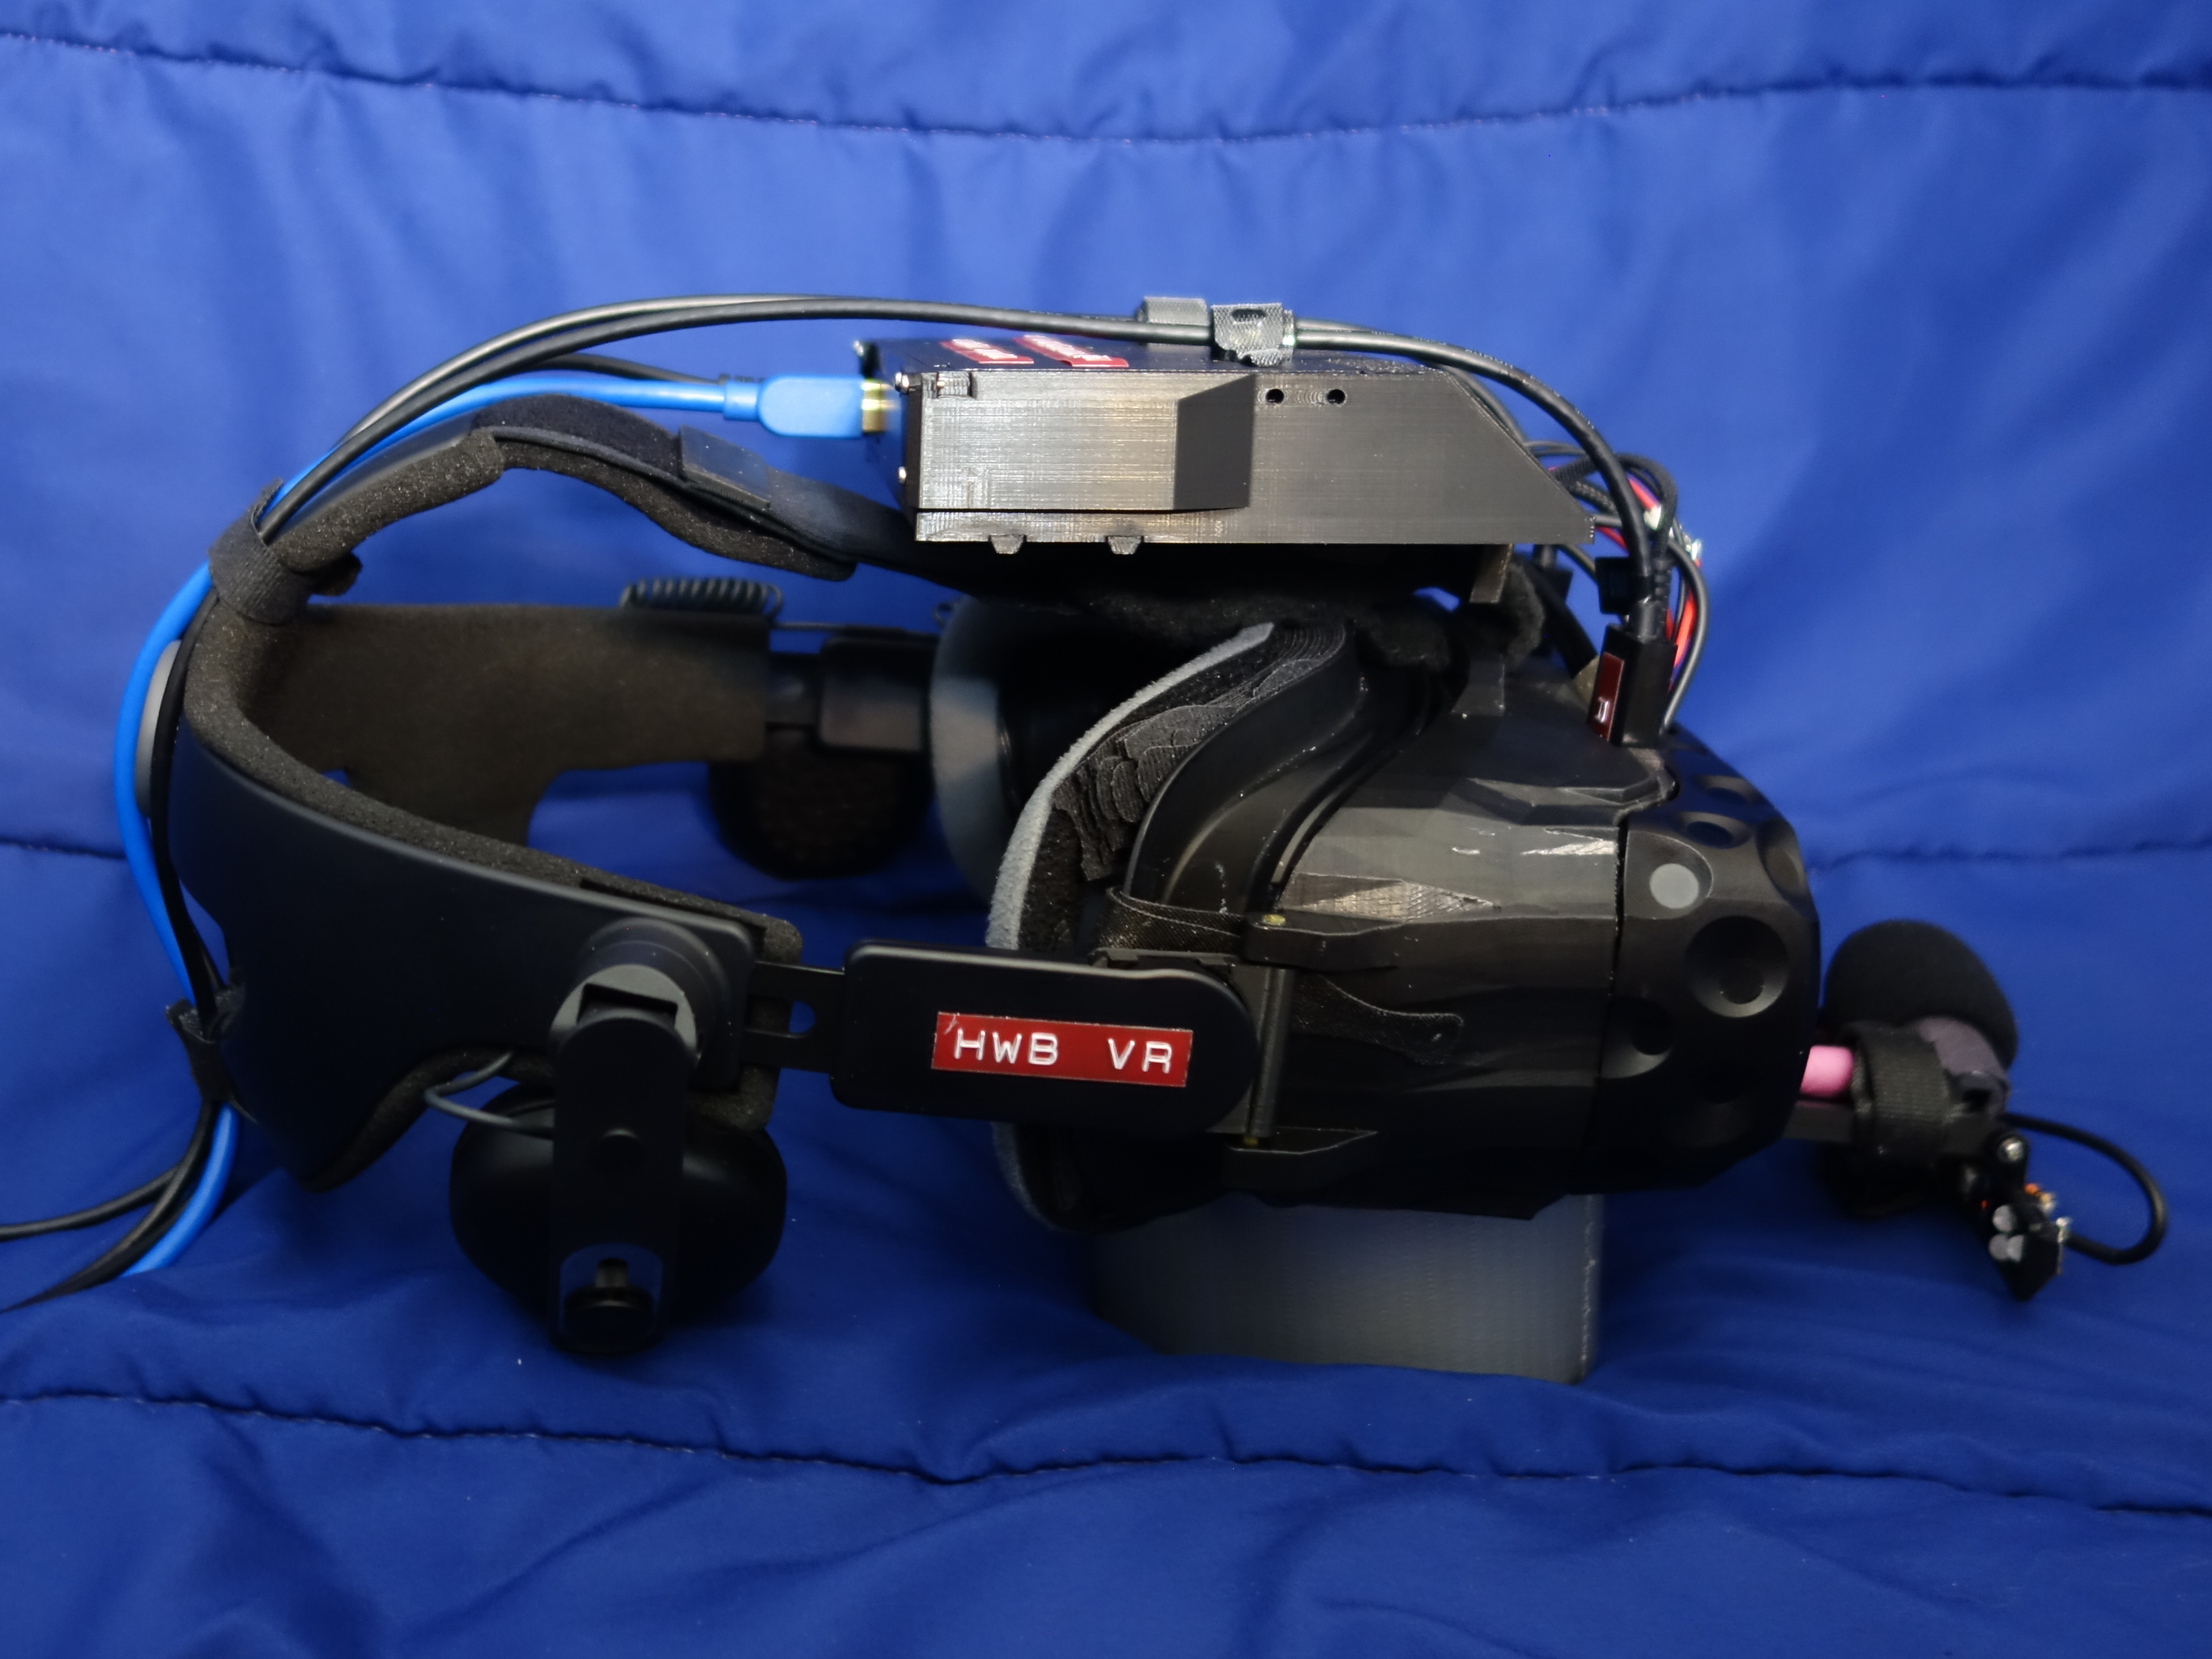
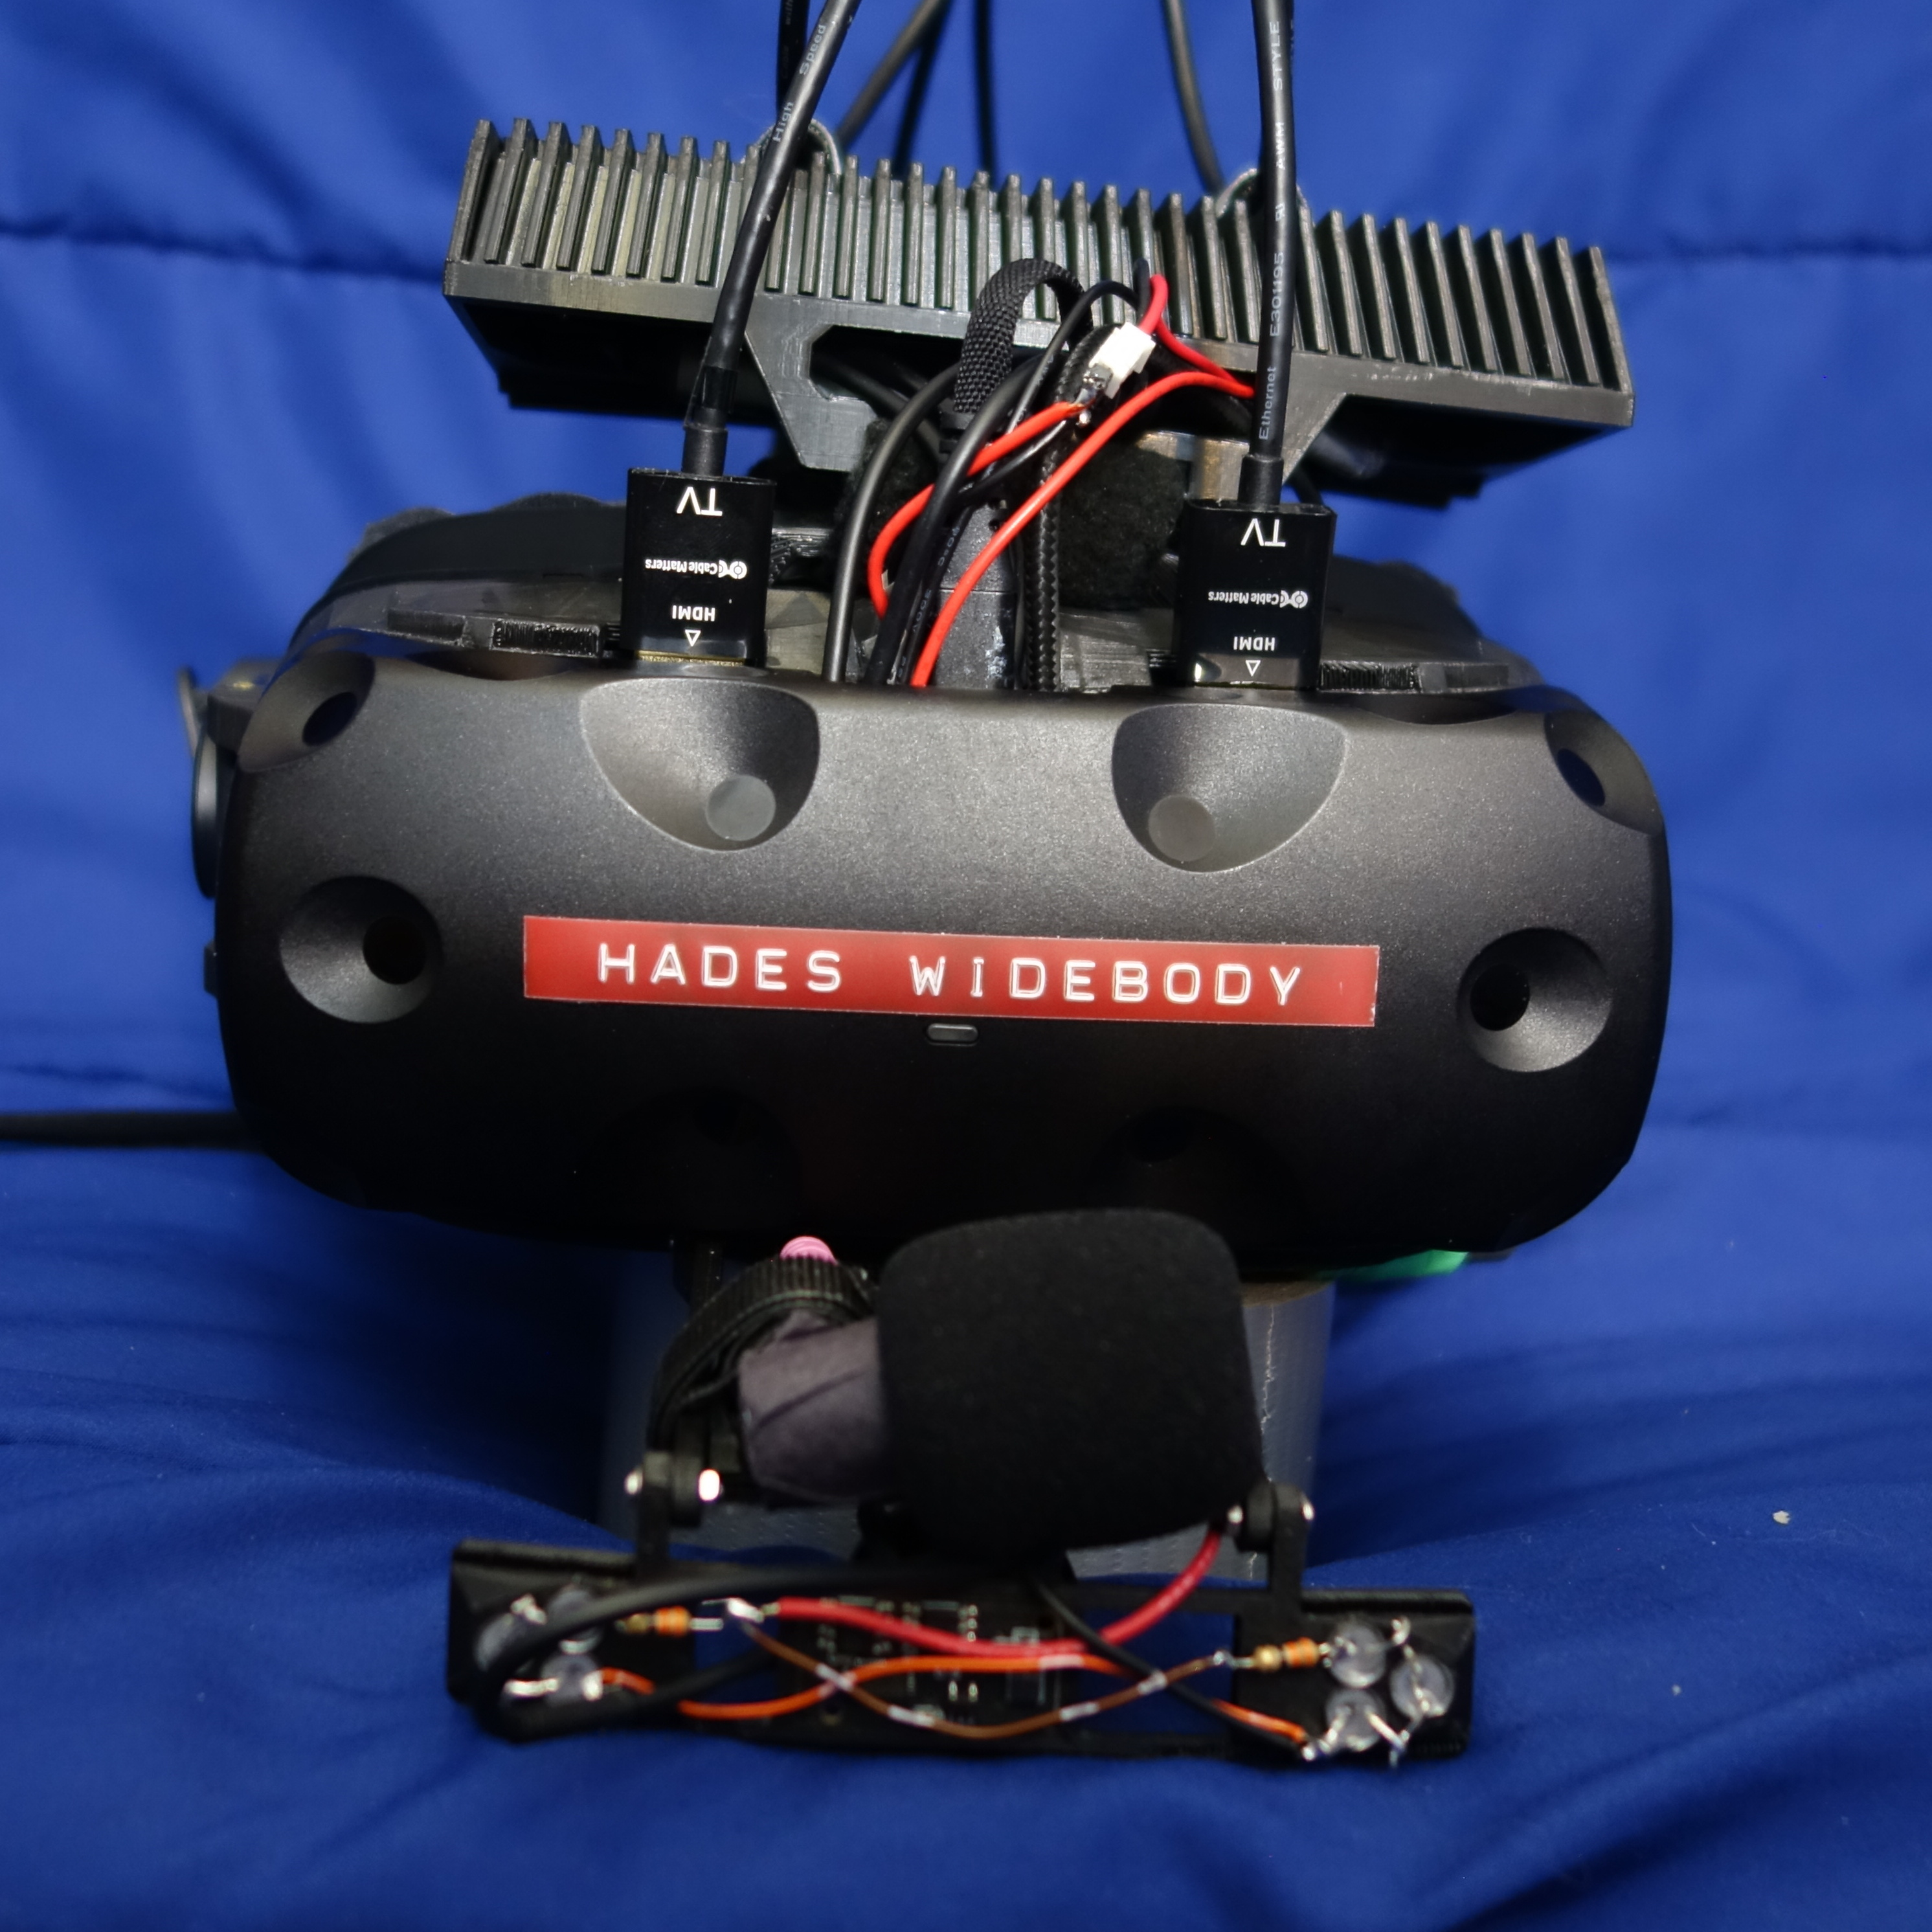
The Top Box
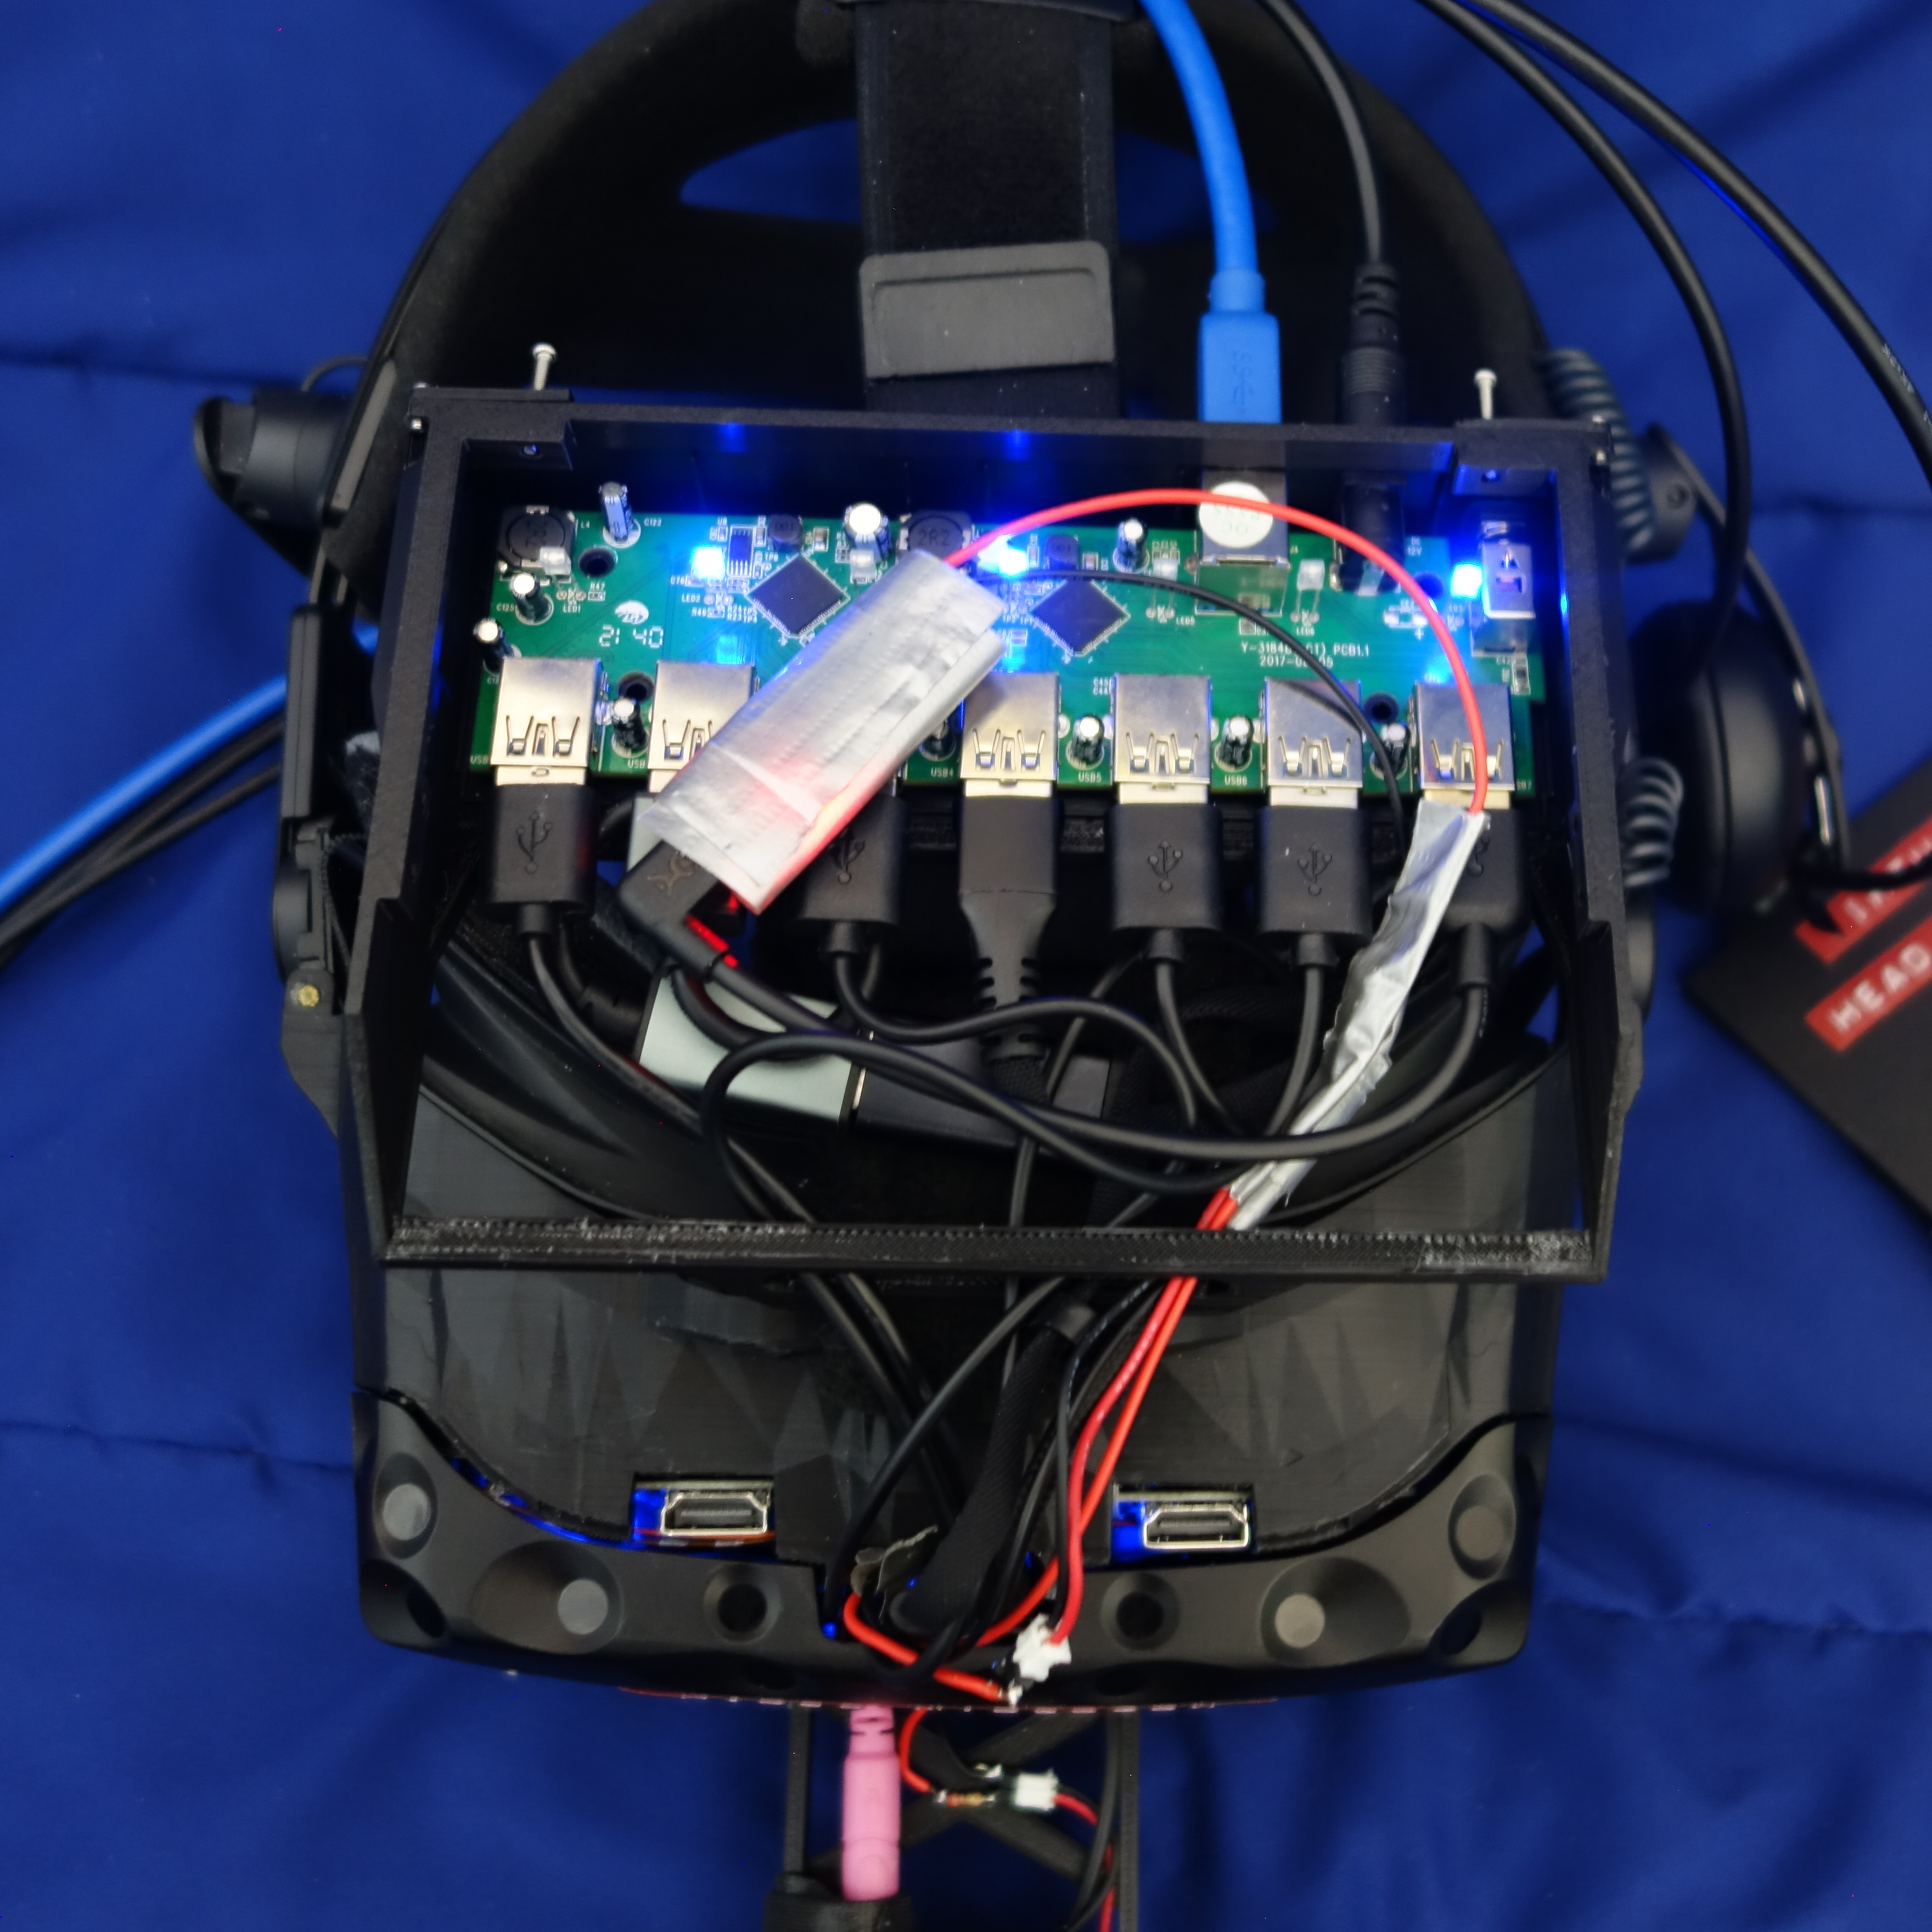
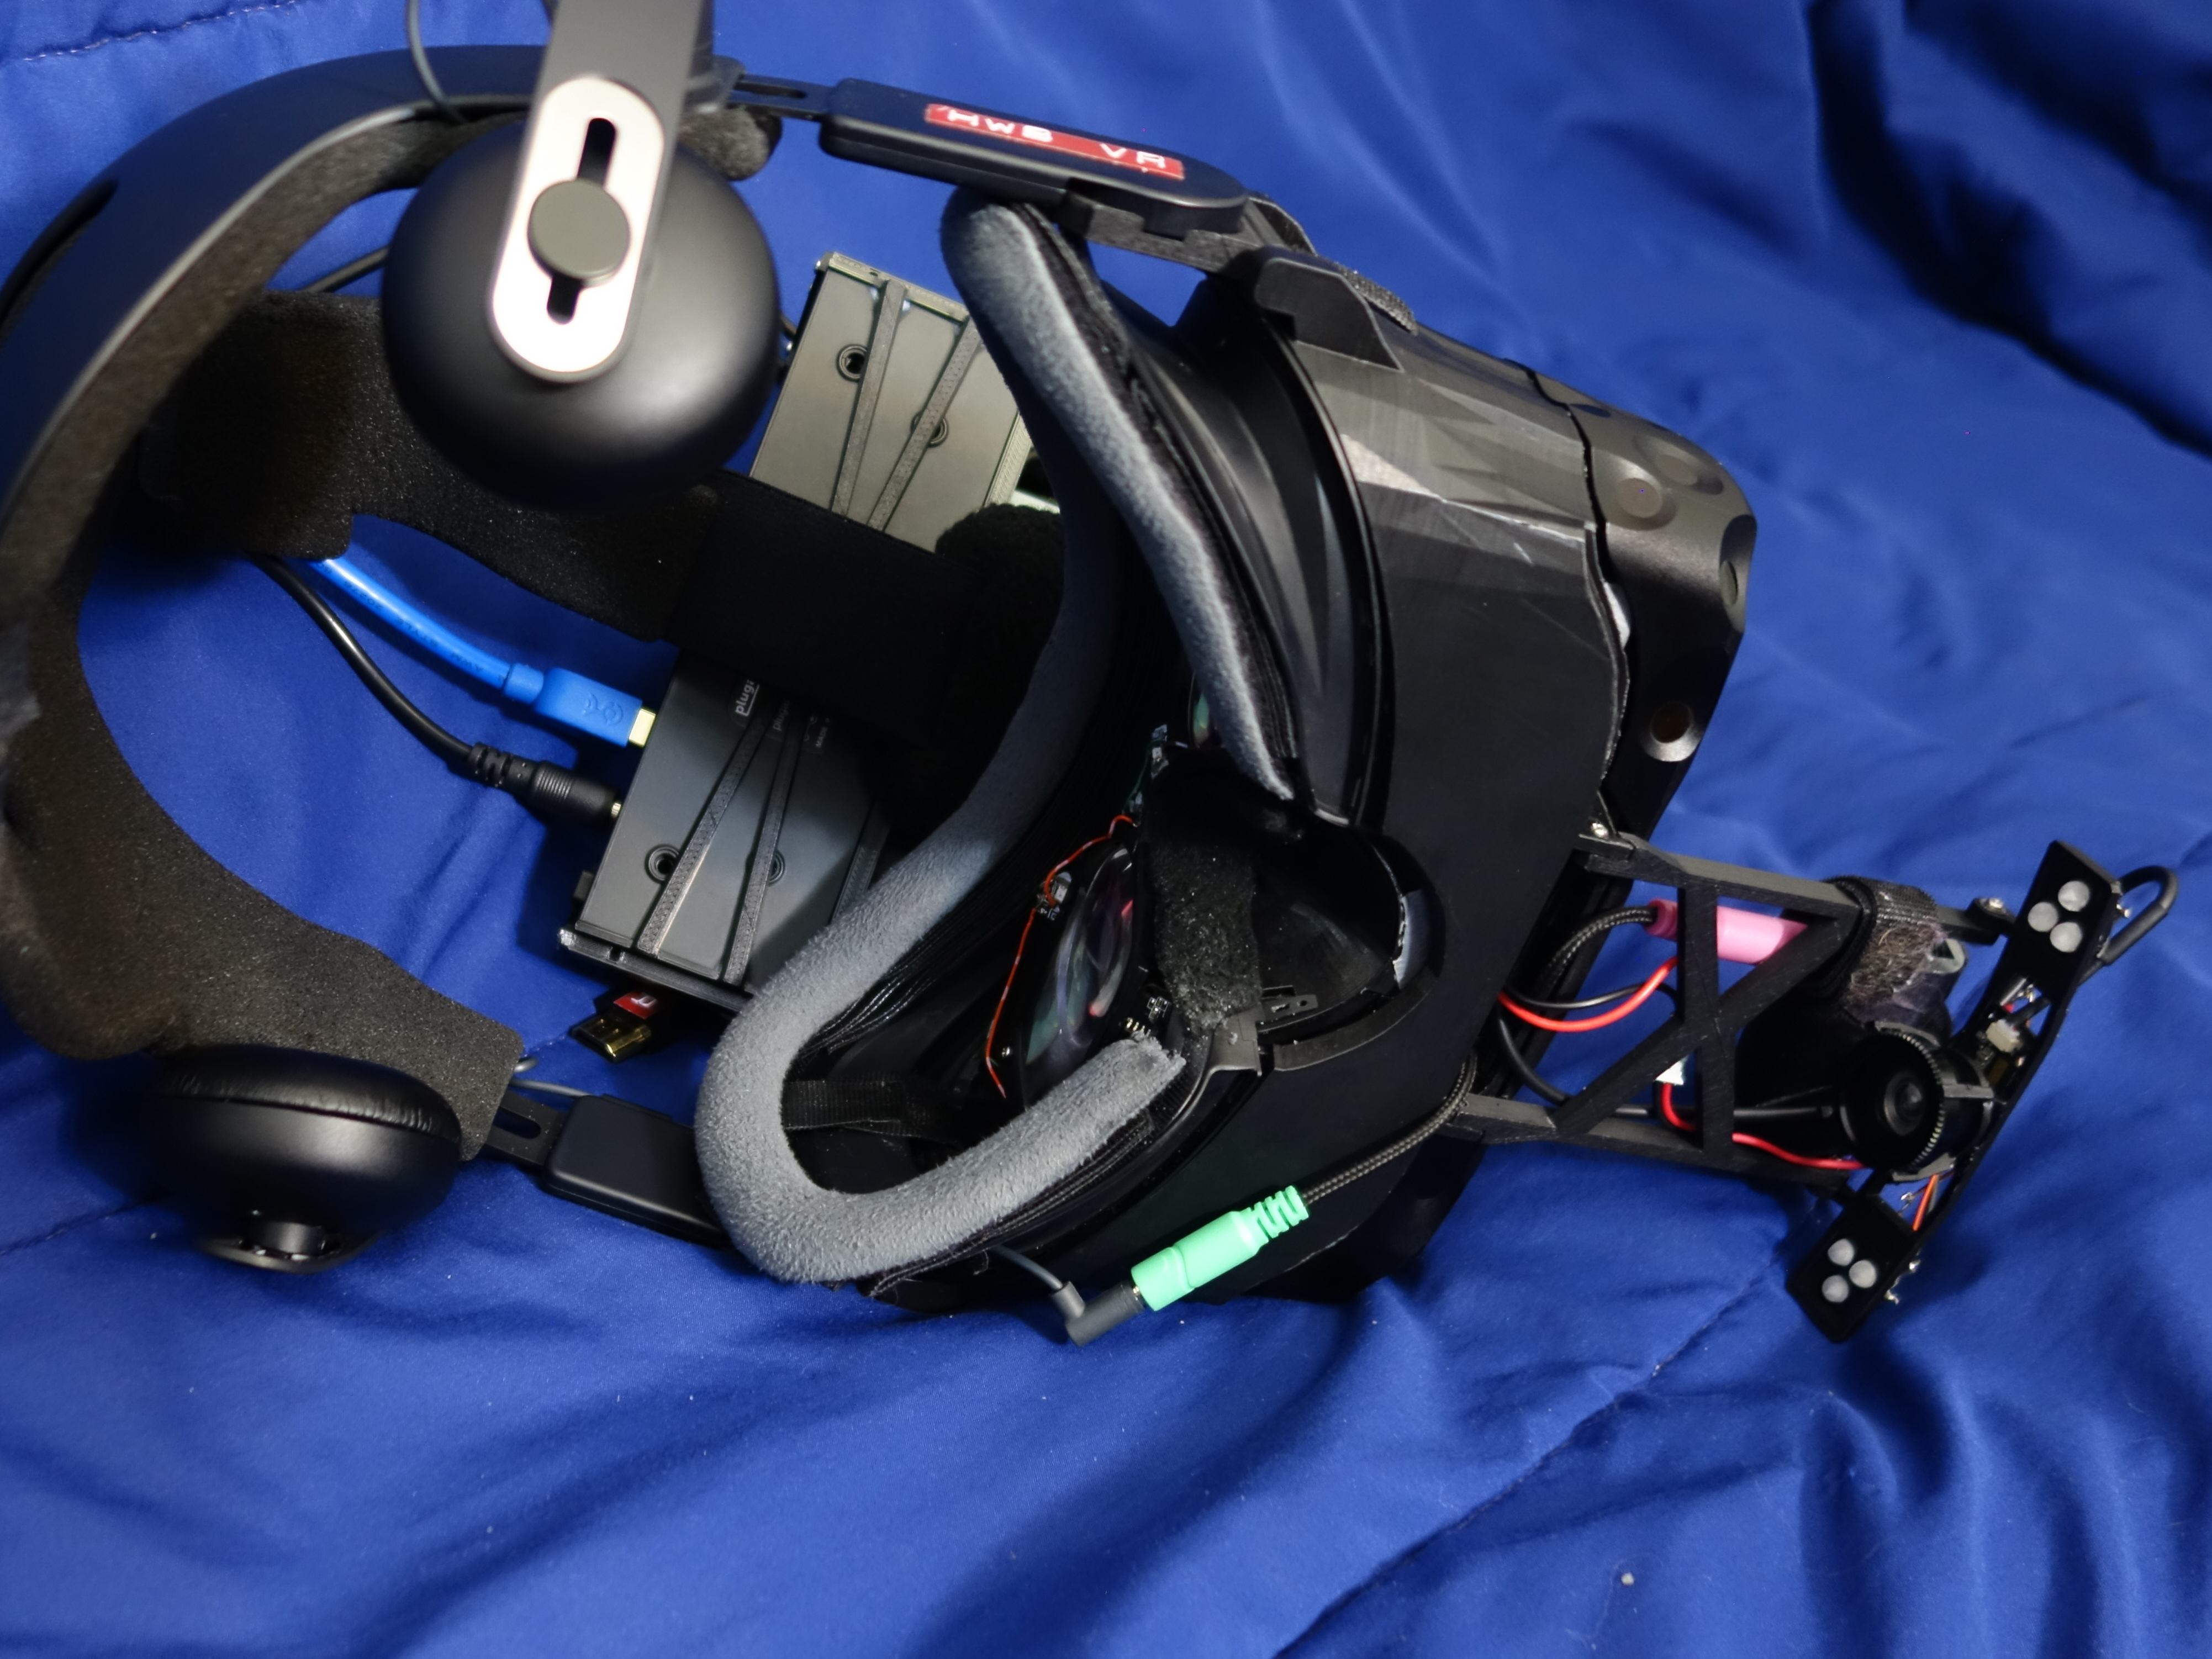
Now, whenever I show people the headset, there's ALWAYS something said about the top box. Trust me, I didn't want to do it like this. I tried, REALLY hard to make the USB hub fit in the casing of the main headset, but there was not a position it would fit without one issue or another. (Blocking photodiodes on the tracker, made the front come out too far off of the face possibly screwing with trying to get the tracker offset set correctly, the USB and power sockets bumping right up against the forehead, some others I'm probably not recalling.) So the top box was born.
Every USB port on this thing is legitimately used for something. 1x being used to power the displays, 3 cameras (1x face and 2x eyes), 1x for the USB DAC for the headphones and microphone, 1x that gets used for the Pro Micro that's a glorified power supply for the various IR LEDs for the cameras + acting as a HID device for the SteamVR driver to pick up on, and 1x for the Lighthouse tracker.
Originally the top box was a centimetre shorter, and it was a solid piece instead of having a lid that could be taken off. Suffice to say, after a bout of mildly stressful troubleshooting when I didn't know what went wrong when the headset decided to up and die until I knew what went wrong (I suspect a USB cable for one of the cameras may have shorted, which was promptly replaced), that got fixed with the reprint you see here pronto.
Eye Tracking
The eye tracking wound up being a trip. Given I was building a headset from the ground up, I didn't want to do the typical thing of "Shove cameras into the open gasket area, getting a way off-angle view of the eyeballs". I wanted a dead-on view of me eye holes. Which how you do that, is some sort of reflector in the eye-tube (I didn't know what the lens/display/plastic in-between part was called until this project) angled towards cameras inset, typically beneath, the actual lens. It was, a challenge to say the least, trying to find the angle that would actually SEE my eyes directly and would also fit within the restraints of the lenses needing to be where they needed to be (the lenses and reflector are THIS close to touching).
Originally, the plan was I was going to use 30/70 mirrors for the reflectors, which was not ideal as that would mean cutting out 30% of the light from the displays and only reflecting 30% of the IR light from the IR lit eyeballs. (I was HYPER paranoid about IR light safety with eyes. The project I'm relying on to make the eye tracking work, EyeTrackVR, whom sell a kit for pre-safety-tested IR LED boards for this purpose, recommend 5ma of power to the LEDs per eye. I have ~4.7ma to both eyes, TOTAL.)
Now, the proper way to do this is with hot mirrors. A mirror that's specifically designed to let visible light pass through and IR light to get reflected, but there were no off-the-shelf "Buy me now" listings for hot mirrors in the size I need (6.8cm square, listing I could find only went up to 5cm square), and the immediate jump in expense with getting custom ones cut was a no go.
But during putting the headset together, I was introduced to UV/IR cut filters. Their intended purpose is to be a filter that blocks out UV and IR light and only let visible light through for cameras. But, "blocking" ain't how reality works, that light has to go somewhere. And turns out, point a IR camera at a cut filter and it acts as a pretty dang good makeshift hot mirror.
(The problem I'm having at the minute is with everything assembled and going, it's also kinda doing a good job of reflecting visible light from the displays as well, causing a reflection of what's on the screens to show up in the eye camera feed (IR cameras are just normal cameras WITHOUT a IR filter on them). Have IR Pass filters (Passes through IR light, blocks visible light) in the post I'm gonna stick onto the cameras to try and fix this.)
Now, the ones I got are 1.1mm thick. And also round. No problem, just go and get some bigger than what I need, make shims to go around the mirror to fit the round mirror in the square slot, and cut down the glass to size.
I bought two, broke one cutting it, bought another two, broke BOTH OF THOSE trying to cut 'em, didn't want to keep throwing $35 + 2 weeks shipping a pop down the drain, so now I live with one of the reflectors having a big ol' crack going down it. At some point I'll try to replace that one. This time, having the humility to act on that "Hey, contact us if you want a custom shape cut" from the ebay listing I didn't see the first or second time around. Or maybe I get lucky and find a way to get actual hot mirrors, who knows?
Lighthouse Tracking
The Lighthouse tracking was a journey in itself. Originally, the plan had been to get a Vive 2.0 tracker for headset tracking purposes, which I did buy in anticipation for the project (worried about availability when the 3.0 trackers were announced (Physically smaller trackers = not conducive for my use case), would have been a non-issue in the end) but ultimately didn't use, now mostly being used for occasional chest tracking duty.
I don't remember how, but at some point I come across the Arpara Tracker. A accessory for the Arpara headset that, because it has no native 6DoF tracking, relies on this accessory to give it tracking and make it a actual VR headset. Which, it connects over standard USB to the headset (Would have loved to use the Vive Cosmos faceplate for this purpose, but the connector there is some funky proprietary thing, that while is likely just USB over the connection, I didn't want to spend $200 to find out) and I heard from scant info I could find about it that it was apparently made in conjunction with Tundra Labs. Meaning, it was likely just using their Lighthouse SoP to do all of the actual tracking stuff, and it'd be trivial to edit its .json file to make it do what I need it to do. (The same procedure to make a Vive Wand think it's a tracker to use for Lighthouse tracker things.)
This was with 2 days left on the Campfire (Japanese equivalent of Kickstarter) campaign and no idea if there was going to be a western Kickstarter/Indigogo or whatnot. Thankfully, I had a friend who was living in Japan at the time who offered to forward it to me if I went and got it. So that's exactly what I did. A few months later and I get it in hand. (Turns out, there was a eventual western Kickstarter, but I couldn't just buy the Arpara Tracker by itself with that campaign, so I lucked out there.)
Turns out, I was right on the money. Plugging it into a computer, it straight up just shows up as a "Tundra Tracker", along with two Watchman Dongles (what is used to connect Lighthouse tracked devices wirelessly to a PC) built in, which I wasn't exactly certain on until long after I already put my pledge in. Took some screwing around with editing down the .json file to make it think it was a tracker and show up in SteamVR, but I ultimately managed to make it work.
Now the wrinkle there was, I'm relying on a function of SteamVR called a "Tracking Override". It's really more meant to facilitate developing new kinds of VR tracking and making it easy to tie that in-development tracking solution to a existing headset (or hand controllers), but for my purposes (Replacing the non-existent (read: what I'm disregarding) tracking of the HadesVR (The DIY headset SteamVR driver I'm relying on to make the headset end of things work with SteamVR, and by extension any games running through it (Dude who writes it, Liquid, is amazing by the way, with the utter level of inanity he's put up with from me on this endeavour with trying to get this VERY custom headset working, I continue to not be able to thank him enough)) with the Lighthouse tracking of the Arpara Tracker), it's absolutely PERFECT.
The problem, the Arpara Tracker shows up to SteamVR as a tracker. This is fine for any games / software that doesn't care about Lighthouse trackers. The game I currently play the most, ChilloutVR, being a social VR game that supports full body tracking, liked to bind the chest or hip tracking to that "Tracker". Which was 'no está bien'.
Turns out, the solution I eventually stumbled on was: Instead of there being three types of SteamVR devices I could make the tracker think it was ('''HMD''', can't run "two" headsets at the same time without software being VERY unhappy, '''Controller''', which was screwy to get going with getting devices started in the correct order and not ever loosing connection to one of the controllers ever, and the aforementioned '''Tracker'''.), there's actually four. The forth type being "Null". Which, turns out, making the Arpara Tracker think it was a "Null" type device, makes it not show up to SteamVR at all as anything, but it still functions and tracks just fine and overrides the tracking of the '''headset''' just fine, completely eliminating any "Shows up as a tracker in game" related conflicts.
Face Tracking
Also there's a face tracking camera, that's kinda neat. Had to slap a wide angle lens in front of the camera to see all of my face. Using a project called Project Babble to take that camera feed and do face stuff in-game. Not much to say about that all things considered.
Rapid Fire Quick Questions
"How much did it cost?"
I don't know, and frankly I don't WANT to know, especially with the replacement displays and the replacement reflectors. But if I had to give a ballpark estimate, I'd guess a ~$700 range all in, not counting f###ing things up. Parts purchased over QUITE a long time to spread costs.
"How much does it weigh?"
In its current incarnation ~951g without the cables. Which for comparison, the Pimax 5k+ is 1055g and the OG Vive is 920g (Though with the cables), (Both of which I own, as measured by myself), and the Index is apparently 809g officially. The point to be made about this is, because of the top box's placement above the head instead of ALL of the weight being in the front, this pulls a bunch of the weight off from hanging off of my head and moves the centre of mass somewhere inside of the head instead of outside.
I did think about putting the top box on the back of the headset instead of the top, but I didn't want to run all of the >7 cables across and over the head.
"Why no IPD sliders/screws?"
I wanted to, I really did. Originally I wanted IPD adjustment, height adjustment of both eye tubes inside of the headset so I could adjust how the face gasket sat on my face independently of where the eye tubes were, and angle adjustment of the eye tubes for similar reasons.
I got to designing the parts, and ran into the issue of having basically, zero space to move ANYTHING. I could have moved the tracker farther forward and alleviated ALL of that sure, but I didn't want to balloon the Z depth of the headset to silly extents (Width was fair game, hence the name "Widebody"), and with the eye-tubes being one unit, it JUST fit a certain amount into the tracker, shaving Z depth off and minimising the main problem I was trying to minimise on that point with not wanting to run into issues with in-software tracker offsets by having the tracker a million miles away from my face.
"How big is it?"
Literal dimensions are 21cm at its widest point where the outsides of the posts for the DAS clips are. About 11cm in depth from the outside edge of the rubber gasket to the front of the Arpara Tracker, ~18cm if we include The Sled the face tracking camera goes. About 5cm deep between where the hard plastic starts in the middle of the headset and the front of the Arpara Tracker.
With a ~8cm height where the rubber gasket part attaches to the headset. Which anything to do with height was more dictated by the parts going into it than anything. None of that is including the top box.
However, as a more tactile description: "It's about the same width and depth as a OG Vive, but about half of the height at the front where it matters. Again not including the top box."
"Ok, that's cool, but how big is it compared to a Bigscreen Beyond?"
Ok wise guy, in the image below is a to-scale visualisation of the Bigscreen Beyond vs. the Hades Widebody. Bigscreen Beyond can easy fit within the size of the Arpara Tracker. But the Bigscreen Beyond ALSO fits within the width of the FoV of the headset.
"Can you build one for me?"
I'm NEVER building one of these again, lel. It was built to be the daily driver I wanted to have, and it will be that personal daily driver for as long as I can keep it going.
If you're mad lad enough to try and build one, you're on your own beyond what's listed above. Whatever you do or break or change is going to be on you and there's not anything I can do to help you. You NEED to be the kind of person who doesn't know the meaning of the word "Quit" and can problem solve your way around any and every sort of DIY jank to try and make a thing work. This project is not for the faint of heart, or wallet. If you accept that responsibility, go crazy. I'd find it hilarious if someone else actually tried to build one and would love to know about it if you succeed.
"What about a v2?"
It's something that's crossed my mind. Not ANY time soon, but if I were to eventually do a v2 of this, what I'd do is:
Swap out the displays for 16:9 1440p or higher displays, running at 90hz. Either OLED (Preferred) or a double-stack LCD with local dimming.
Instead of the 8cm diameter 4cm FL fresnel periphery lenses, get 10cm ones or 12cm if they exist (I know 10cm ones do, haven't found 12cm.)
Cant the displays 5-10°'s. I very deliberately didn't cant the displays on this headset (Which the fact I'm getting Index tier FoV without doing so (Index's eye-tubes are canted 10°) is astounding) because I already had enough unknowns with getting the software side going I didn't want to add the complexity on TOP of that of canted displays. Now I know how the software side goes, that's not a problem.
If the wider periphery lenses don't cover all of the 16:9 displays (which I highly doubt they would), get a bunch of really tiny light pipes and run them from the sides of the otherwise unused displays and route them to the very outer periphery of the sides of where the periphery lenses are to maximise FoV even MORE.
The hard part there is the availability of displays. No such 16:9 90hz panel exists on the likes of Aliexpress or Alibaba. OLED or otherwise at any resolution. If they did, I can guarantee you I'd be using those panels instead of the ones I did right now.
Conclusion
If you actually read through EVERYTHING everything, thank you for your interest in my ramblings. Despite the, quirky, nature of this headsets and the glitchiness and annoyances using it, I'm glad I did it and have it now. It is, sans the lack of "Professionally manufactured with the DIY bits smoothed over", exactly perfect for what I want out of a VR headset, and will happily be using it for, hopefully, many a year to come.